
[xyz-ips snippet=”lesson3″]
Introduction
Building circuits has become much easier with the advent of easy-to-use microcontrollers, MCUs for short. One of the most popular and easy-to-grasp platforms for designing and programming MCU-based systems is Arduino.
“Arduino is an open-source electronics platform based on easy-to-use hardware and software.”
While the most popular Arduino microcontroller would be the ‘Arduino UNO’, there are many different types of both Arduino and Arduino-compatible MCUs on the market.
Microcontroller Basics
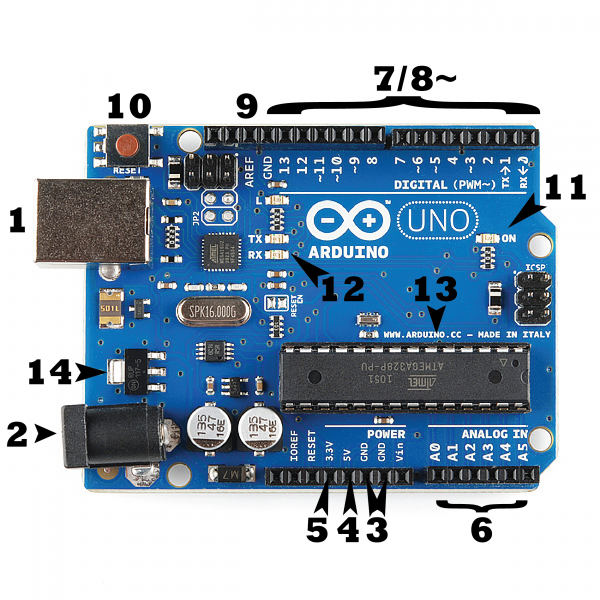
While there are many different MCUs available, they all share some common basic components and functionality among them. As we go over these basics, we will be using an Arduino UNO as our example MCU.
Power
1 & 2: Power [USB/Barrel Jack]: All Arduino boards and other microcontrollers need a power source. Power can be fed to the Arduino MCU by either the USB port or Barrel Jack. The range of supplied power is often listed in the description of the MCU, but for the UNO this is recommended to be between 6 and 12V into the barrel jack.
Pins
The pins on a MCU are where we can attach our components and sensors so that we may interact with them. These pins vary slightly based on their function, but the most common pins include the Power, Ground, Analog, and Digital Pins.
- Power (5V, 3.3V): These pins are where we can source 5V or 3.3V power for our sensors and other attached devices.
- Ground (GND): These pins are where we can ground our devices with a common ground.
- Analog (A0 – A5): These pins allow us to read analog signals from our sensors and other attached devices.
- Digital (D0 – D13): these pins allow us to read digital signals from our sensors and other attached devices.
CPU/Clock

The core components of the Arduino UNO include a ’16 MHz’ quartz crystal, responsible for its clock ‘speed’ or ‘rate’. The clock rate refers to the frequency at which a chip such as a CPU is running. The UNO can run at a minimum of ‘8 MHz’ and a maximum of ’16 MHz’, which is fine for small to medium projects.
The Microcontroller itself (pictured on the left) is the ATMEL ATMega328P and is the brains of the Arduino UNO. It is a 16MHz MCU with 32K memory available for storing programs.
Memory
The next major component is the ‘Read Only Memory’ or ‘ROM‘. This is the amount of space you have available to write and upload code to the Arduino. When you power of the Arduino this code will still persist as it is written to the onboard 32kb ROM.
Input & Output Pins

Next we will discuss the Input and Output functionality of the Arduino. Sensors and other components are attached to the Arduino via it’s ‘General-purpose Input/Output’
pins or ‘GPIO pins’. The pin types consist of Digital Pins and Analog Pins, each with their own specific use cases.
Digital pins are either read as High (logic 1) or Low (logic 0) and NOTHING INBETWEEN. They can be used as inputs AND outputs and are often used with tactile buttons, switches, motors, or other digital sensors. These pins usually work at the voltage level of the microcontroller, so they either output 0V or 5V if it’s a 5V microcontroller like the UNO.
Analog pins are read as logical 0 and logical 1 and EVERYTHING IN BETWEEN. These can ONLY be used as inputs.
Everything Else
The rest of the components on the Arduino UNO are used in its basic design. These consist of resistors, capacitors, converters, usb serial chip(s) and usb communication port, power jack, and a reset button. Some variations of the UNO come with either a USB Type-B connector or a USB Mini/Micro connector.
Electronic Circuits
Resistor
A resistor is a component that can resist or limit the flow of current. The unit that resistors are measured in is the Ohm ( ). The calculation it is used in is Ohm’s Law, V = IR [Voltage = Current x Resistance].
Capacitor
A capacitor is a passive device that is used to “store electricity”. It stores energy in the form of electrical charge, producing a potential difference across its plates, similar to a small rechargeable battery. Capacitors are measured in the unit known as the Farad, which is a measure of its capacitance.
Diodes
A diode is an electrical device that allows current to move through it in one direction easier than in the other direction. When current flow is permitted, the diode is “forward biased”. When current flow is prohibited; the diode is “reversed biased”.
Voltage Regulators
Programming Microcontrollers
The Arduino UNO and many other popular Arduino-compatible microcontrollers can be easily programmed by using the Arduino IDE and any device specific libraries or drivers.
The programming language used with the Arduino IDE is a form of C++ and should be familiar to those with a basic grasp on computer programming.
Cheat Sheet: Arduino-Cheat-Sheet.pdf
Interfacing With Sensors
Many sensors and modules such as WiFi and BLE can be used with Arduino and other microcontrollers via the broken out digital and analog pins available.
Many sensors for temperature, humidity, gas, etc can use either digital or analog pins and there is a set amount available depending on the microcontroller that you choose.
The Arduino UNO has 14 general Digital Input/Output Pins and 6 Analog Input Pins.
The Arduino UNO uses Standard TTL logic where 5V is HIGH, and 0V is LOW.
Types of Microcontrollers
Aside from the Arduino UNO, there are many more alternative choices for microcontrollers.
Some of these other microcontrollers offer differences in terms of available memory, board size, functionality, and more.
For example, the most recent WiFi + BLE combination microcontroller is the ESP32, which offers many analog and digital pins for interfacing alongside WiFi and Bluetooth Low Energy.
Other popular microcontrollers include:
- Arduino UNO R3
- Arduino Mega
- Arduino Nano
- Arduino Micro
- Adafruit Pro Trinket 3.3V/5V
- ESP8266
- ESP32
- NodeMCU